
Hitting a wall with IP bans or throttled connections during web scraping? Node Unblocker can put you back in control. This guide walks you through what it is, how to set it up, and how to use it to keep your scraper running without roadblocks, even when sites try to slow you down.
HTTP Proxies are handling HTTP requests towards the internet on behalf of a client. They are fast and very popular when it comes to any kind of anonymous web browsing.
A rotating mobile proxy routes internet traffic via mobile devices, offering unique IP addresses from mobile networks. It is a very good choice for SEO monitoring, social media management, web scraping and ad verification, since it frequently changes IPs to avoid blocks.
Node Unblocker is a tiny, open-source Node.js tool that behaves as an intelligent middleman between your application and the site you desire to access. Rather than directly hitting a site, you pass the request to your Unblocker server. It loads the page, rewrites links and assets when necessary, and streams the output back to you, so your browser or scraper can continue to crawl without crashing on rewritten paths or blocked resources.
Node Unblocker is not a VPN. On its own, it doesn’t mask your IP; it just forwards and rewrites requests. If you need privacy or broader access, you can plug in a reliable external proxy service like Anonymous Proxies. This way you can increase your anonymity and reduce IP blocks.
Node Unblocker is a lightweight yet powerful tool for bypassing network restrictions, making your browsing or scraping fast, smooth, and frustration-free. It is very simple to use because you will just need to drop it into your Express app, choose a simple prefix like /proxy/, and you’re ready to roll. Also, it is flexible enough to adapt to any scraping project you have in mind and supports multiple protocols like HTTP, HTTPS and SOCKS5.
Before getting into details, you'll need to grab the LTS release from the official Node.js website and run the installer (the defaults are fine).

After downloading it, open a terminal and confirm the install by typing these 2 commands.
node -vnpm -v
If both commands print version numbers, you’re set.
Once NodeJS is installed, you need to make a folder and initialize it so your dependencies and scripts are tracked in package.json.
mkdir node-unblocker-guidecd node-unblocker-guidenpm init -y
Add the two pieces you need: Express to run a tiny server and Unblocker to handle the proxying and rewriting behind the scenes.
npm i express unblocker
After a moment, you’ll see a node_modules folder and both packages listed in package.json.
Make an entry file and open it in your editor:
touch index.js
Paste this minimal server. It mounts Node Unblocker at /proxy/, includes a quick health check, and supports WebSocket upgrades for sites that use them.
const express = require('express');const Unblocker = require('unblocker');const app = express();const unblocker = new Unblocker({ prefix: '/proxy/' });app.use(unblocker);// Optional: a simple confirmation routeapp.get('/', (_req, res) => {res.send('Node Unblocker is running');});// Optional: health check for monitoringapp.get('/health', (_req, res) => res.json({ ok: true }));const PORT = process.env.PORT || 8080;app.listen(PORT, () => {console.log(`Node Unblocker server: http://localhost:${PORT}`);console.log(`Try: http://localhost:${PORT}/proxy/https://example.com/`);}).on('upgrade', unblocker.onUpgrade);
Be sure to start it up and watch the terminal for the local address.
node index.js
You'll see a message pointing you to your running server.
Load a site through your new proxy by prefixing the full target URL with /proxy/. This is the pattern you’ll use from now on:
http://localhost:8080/proxy/https://example.com/
Try using this pattern to visit Anonymous Proxies.
http://localhost:8080/proxy/https://www.anonymous-proxies.net/
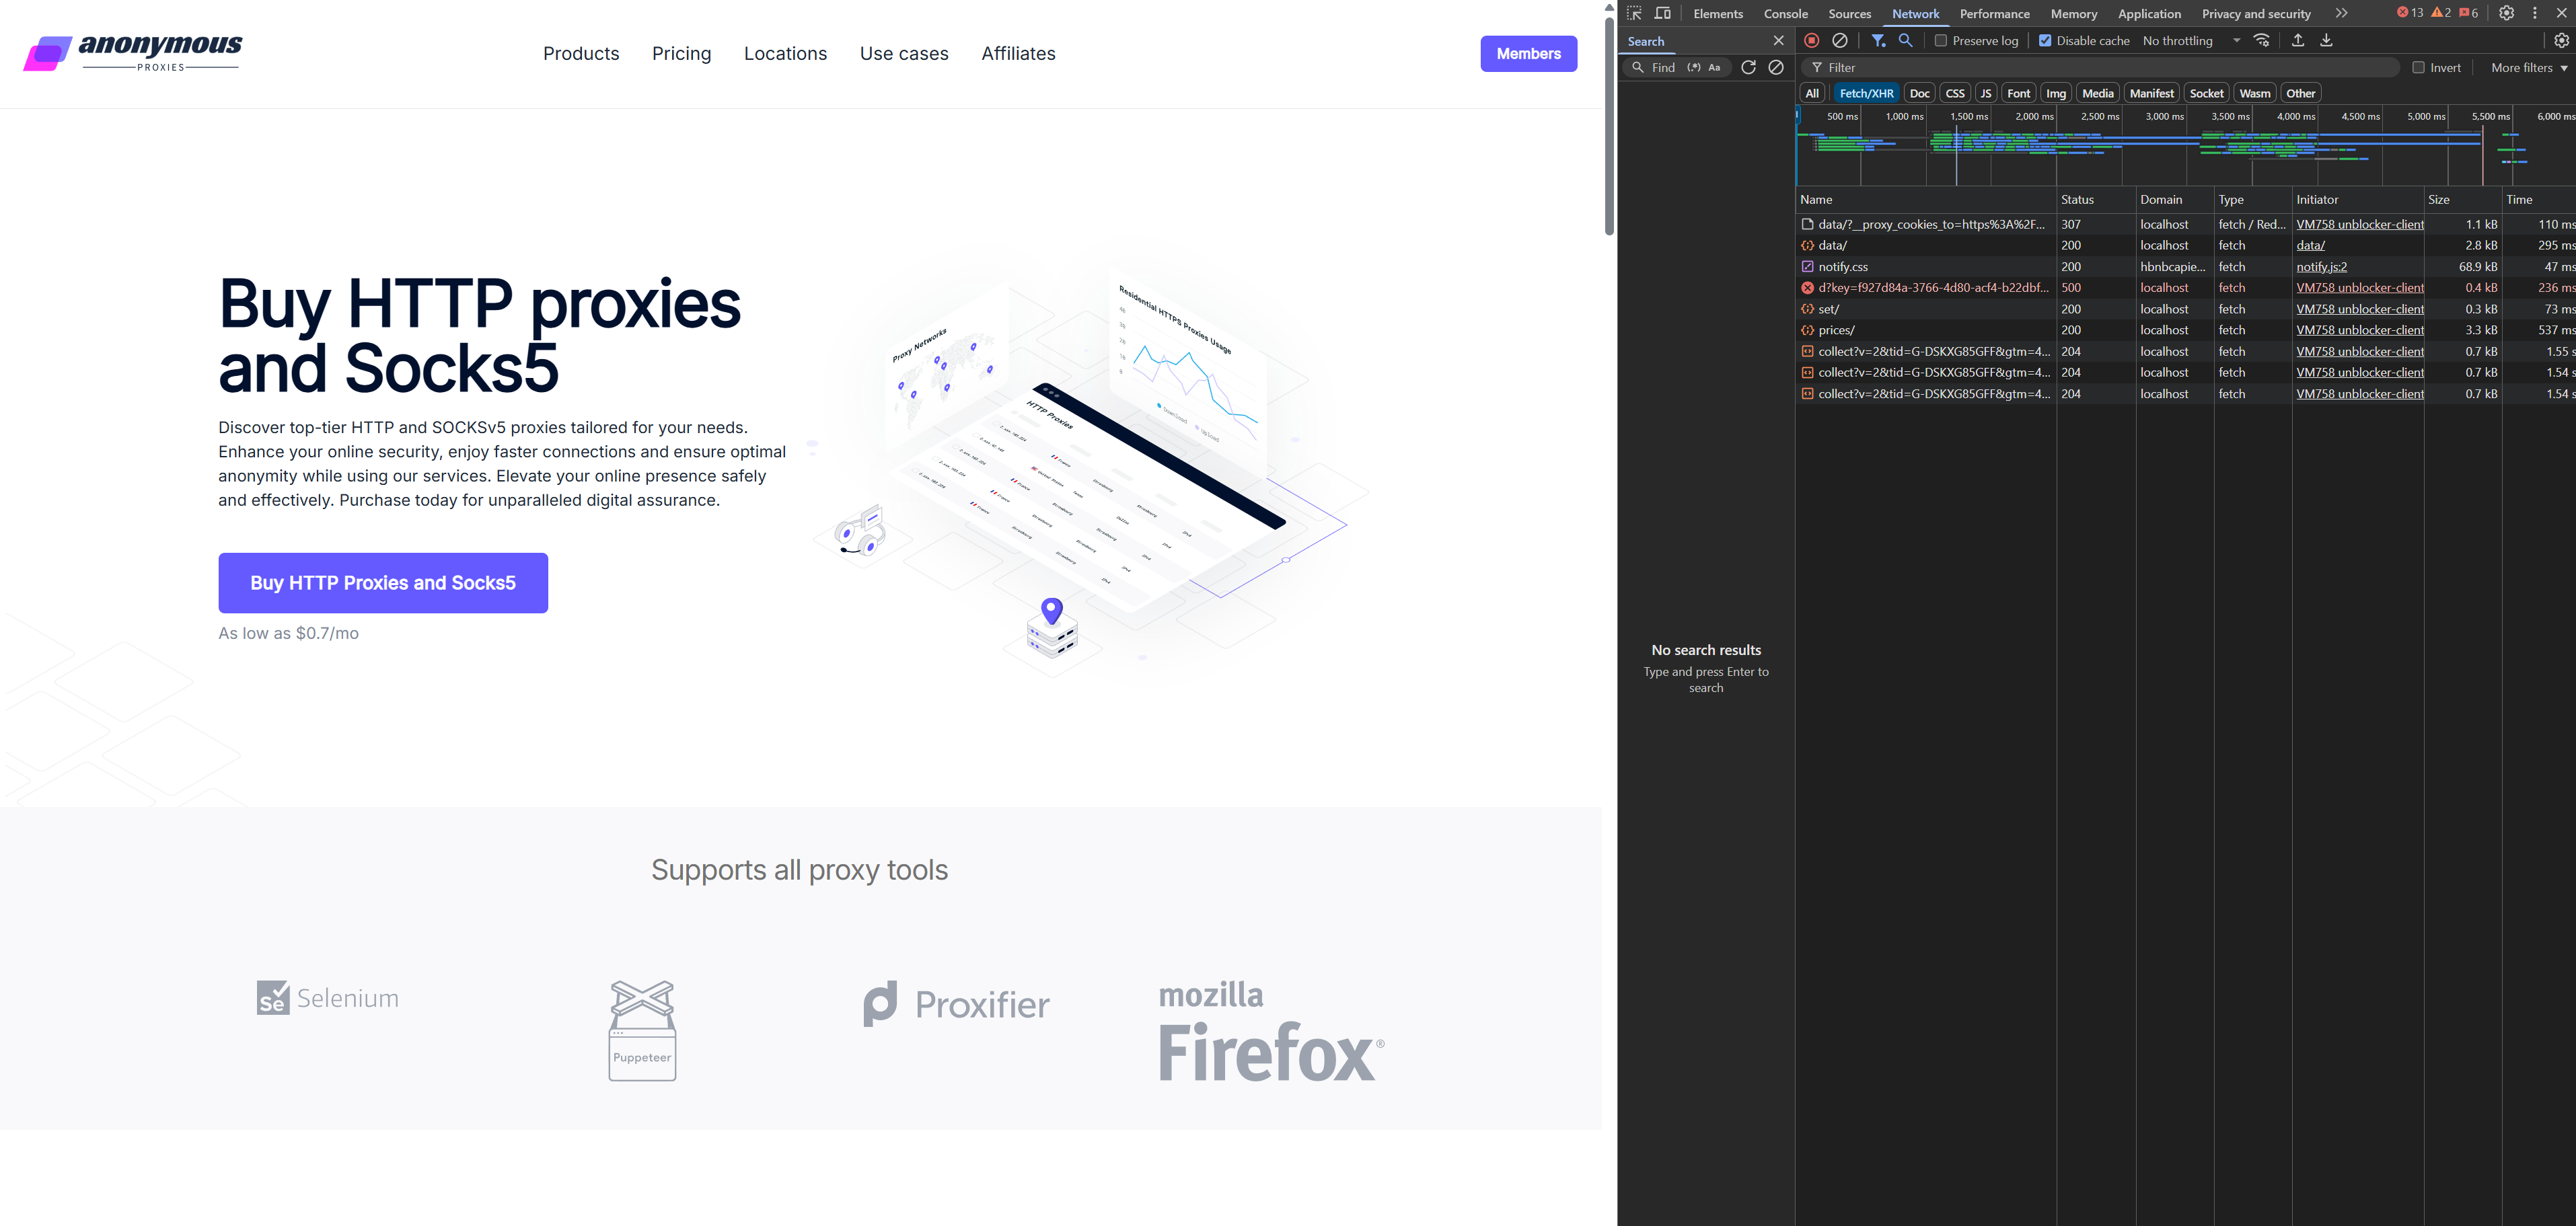
Open the page, launch DevTools (Ctrl+Shift+I on Windows/Linux or Cmd+Option+I on macOS), go to Network → Fetch/XHR, and reload. If you see requests coming from localhost:8080, it means your traffic is going through Node Unblocker as expected.
To scrape efficiently, we will need to use a real browser like Puppeteer or Playwright and point it to our Node Unblocker proxied URL so pages load and behave like they would for real users. If you need to access that URL from anywhere, whether it’s your laptop, a CI pipeline, or a cloud environment, you’ll need to deploy Node Unblocker as a public web service. Any cloud provider should work fine, but for this guide, we will use Render.
Open Render, sign up for a new account or log in to your dashboard if you already have one, then create a new web service.
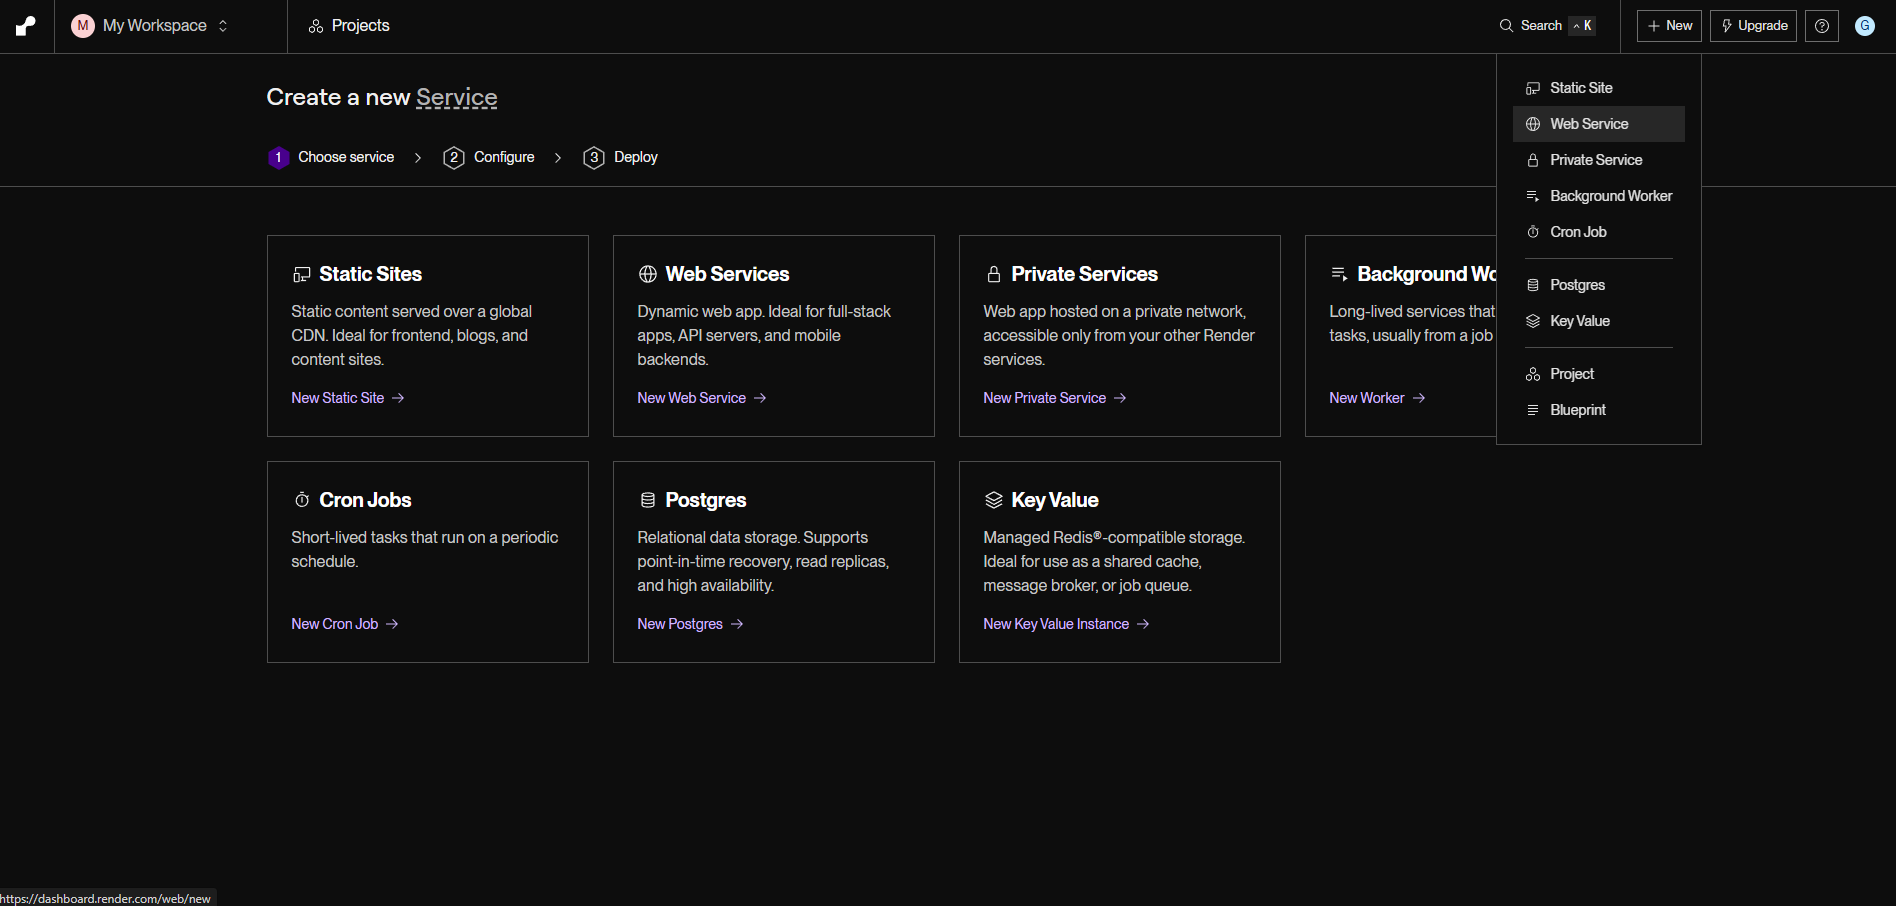
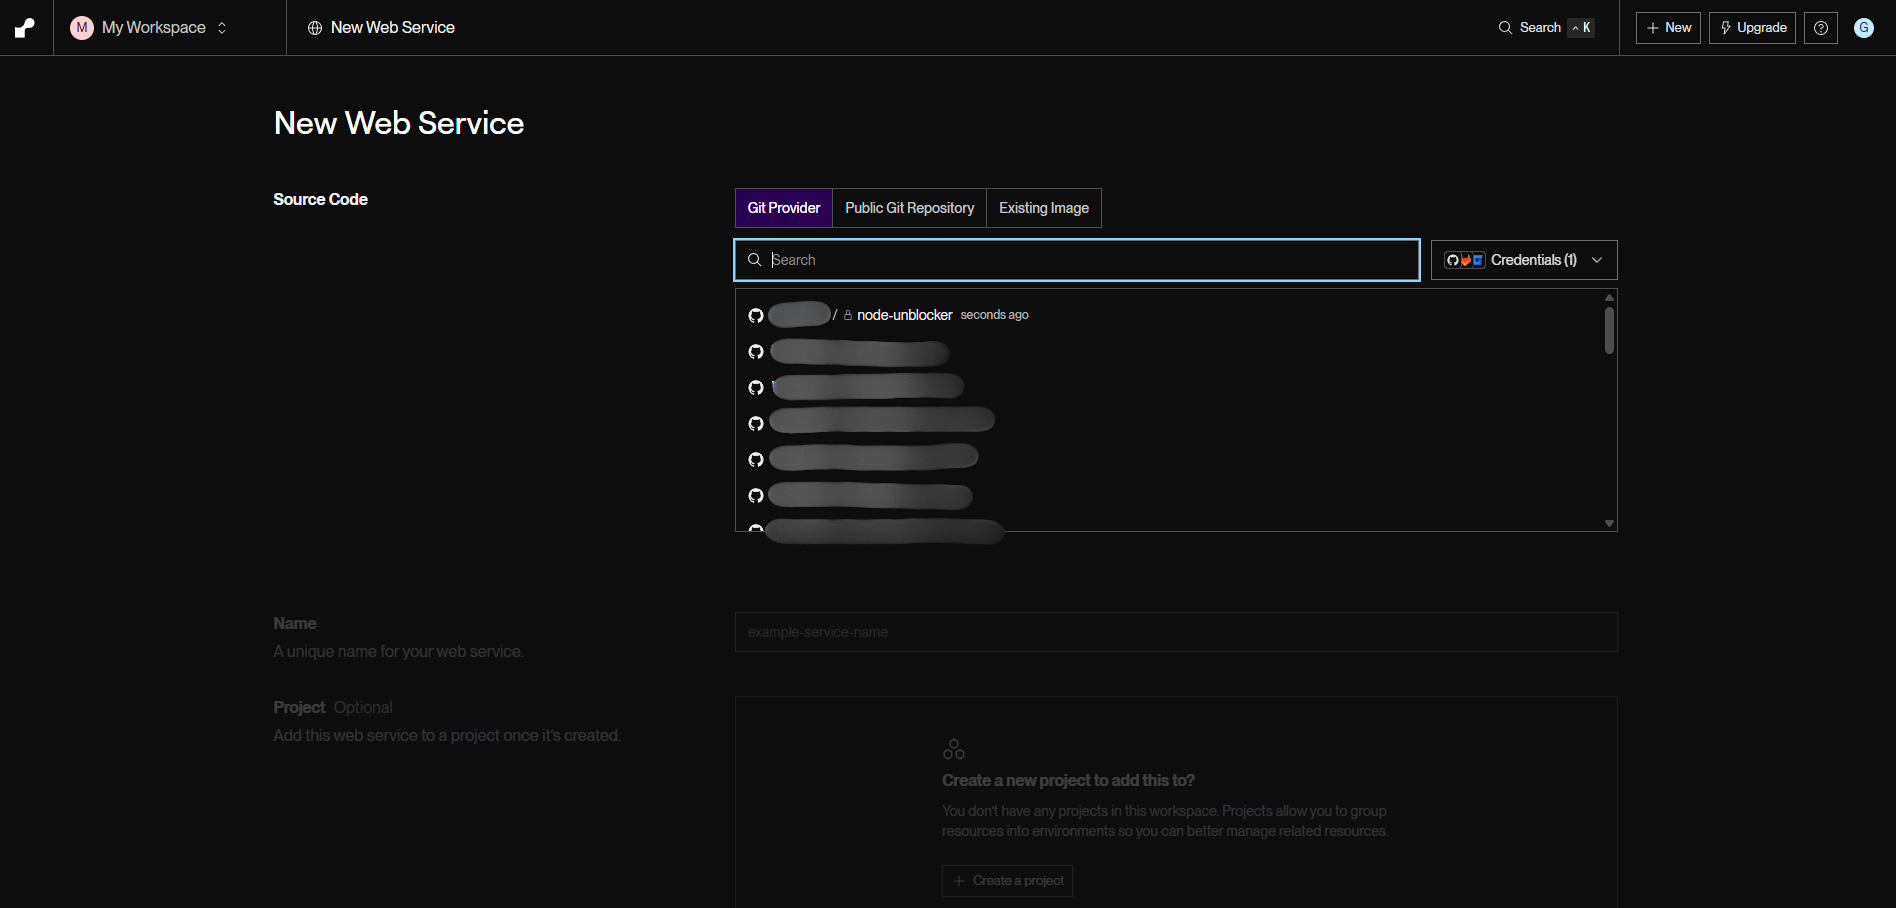
Choose your Git provider, then pick the node-unblocker repository.
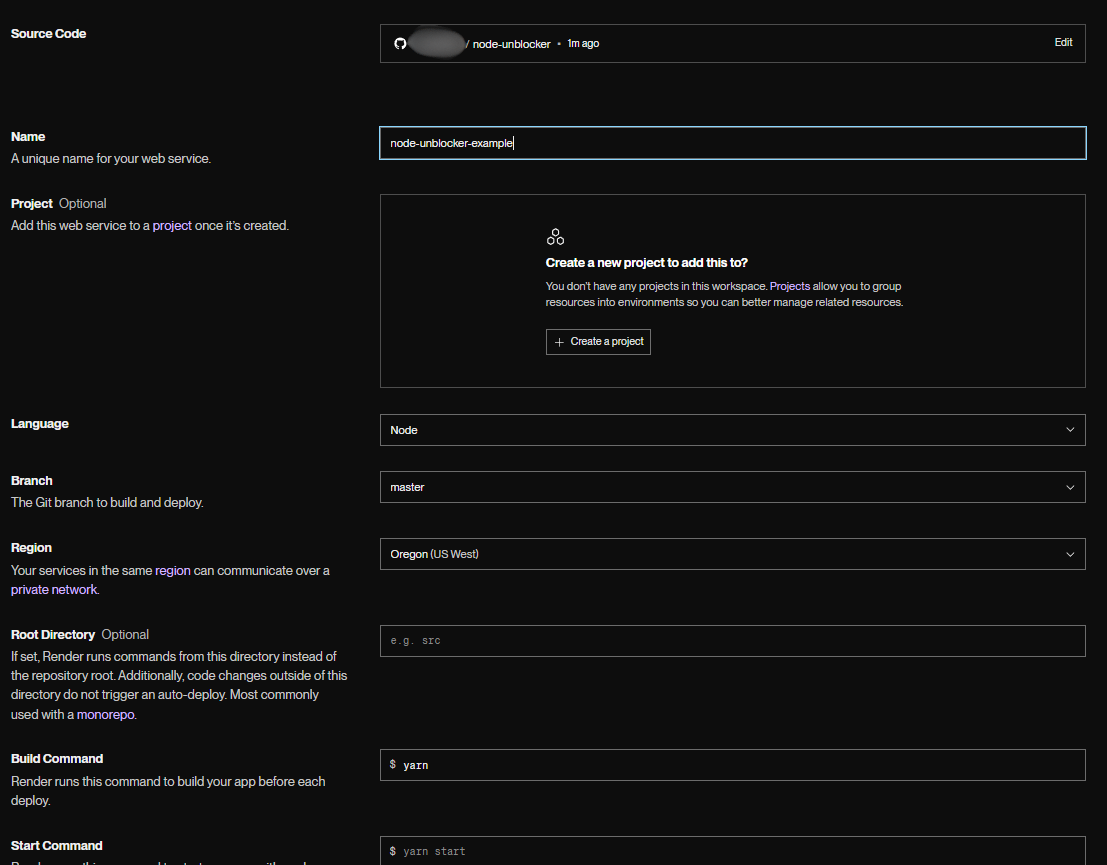
Once you’ve chosen your Node Unblocker repository, you’ll need to complete a few fields that define your project’s deployment settings. The most important are the Build Command, which you can leave blank or set to npm install, and the Start Command, which should be npm start.
Also, your repository must include a start script:
{"scripts": {"start": "node index.js"}}
Click Create Web Service and wait for the deployment to finish. Render will issue a public base URL in this pattern:
https://<YOUR-APP-URL>
In practice, you should receive something like:
https://node-unblocker-olzk.onrender.com
To use the proxy, prepend /proxy/ and include the full target (with https://). For example:
https://<YOUR-APP-URL>/proxy/https://www.anonymous-proxies.net/
Using the concrete example:
https://node-unblocker-olzk.onrender.com/proxy/https://www.anonymous-proxies.net/
Open the URL in your browser to confirm the service is reachable through the proxy path.
Open DevTools → Network. Right-click the header row and enable Domain. Reload the page. You should see your proxy host—e.g., node-unblocker-olzk.onrender.com—in the Domain column for the document and asset requests. That confirms traffic is flowing through Node Unblocker.

You should now try to use a demo site designed for practice scraping, and for this, Quotes to Scrape would be a perfect choice. Then, you need to point Puppeteer at the proxied URL (not the direct target).
npm i puppeteer
const puppeteer = require('puppeteer');(async () => {const BASE = 'https://<YOUR-APP-URL>/proxy/';const TARGET = 'https://quotes.toscrape.com/';const browser = await puppeteer.launch({ headless: true });const page = await browser.newPage();await page.goto(BASE + encodeURI(TARGET), {waitUntil: 'domcontentloaded',timeout: 60000});const quotes = await page.$$eval('.quote', els =>els.slice(0, 5).map(q => ({text: q.querySelector('.text')?.textContent?.trim(),author: q.querySelector('.author')?.textContent?.trim()})));console.log(quotes);await browser.close();})();
Same approach: navigate to the proxied address instead of the direct target.
npm i -D playwrightnpx playwright install
const { chromium } = require('playwright');(async () => {const BASE = 'https://<YOUR-APP-URL>/proxy/';const TARGET = 'https://quotes.toscrape.com/';const browser = await chromium.launch({ headless: true });const page = await browser.newPage();await page.goto(BASE + encodeURI(TARGET), {waitUntil: 'domcontentloaded',timeout: 60000});const authors = await page.$$eval('.quote .author', els =>[...new Set(els.slice(0, 10).map(e => e.textContent.trim()))]);console.log('Authors:', authors);await browser.close();})();
Don't forget to substitute <YOUR-APP-URL> with the exact URL Render assigns to your service, for example: https://node-unblocker-xxxx.onrender.com. If you leave the placeholder as it is, your requests won't be forwarded to your deployed proxy and your scraper won't receive the target to load.
Node Unblocker offers you an immediate, trustworthy way to tunnel traffic through a proxy server under your control, allowing you to handle everyday blocks without jeopardizing your scraping pipeline's stability and integrity. Installing it takes only a few minutes and combining it with tools such as Puppeteer and Playwright, you'll collect data at scale without interruptions.
If you’d like help or a second set of eyes, reach out to our support team. For more step-by-step guides and integrations with popular third-party tools, visit our Integrations page.
We offer highly secure, (Dedicated or Shared / Residential or Non-Residential) SOCKS5, Shadowsocks, DNS or HTTP Proxies.
DR SOFT S.R.L, Strada Lotrului, Comuna Branesti, Judet Ilfov, Romania
@2025 anonymous-proxies.net